How to photograph the Milky Way
March 1, 2019
Landscape photography doesn’t just have to be limited to planet earth, there is the whole Milky Way to explore! Ever looked up at the night sky on a clear dark night? The stars and planets are one of the most mysterious and mesmerizing things out there for photographers, well anyone actually, to enjoy and try to comprehend! You will most likely lose track of time as you get lost in its expanse and beauty. The twinkling blanket of stars can create fascinating fine art landscape photography, especially when you are framing the Milky Way in the scene with an interesting foreground on a cloudless night. Since it’s so big, capturing a photograph of the galactic core of the Milky Way can be a challenge, unless you are in know-how!
If you live in a crowded city where you can’t even see the stars due to so much light pollution, then it is possible that you have never even seen it properly yourself, perhaps only in photos. However, with my step-by-step guide, you’ll have the knowledge to capture a breathtaking photograph of the Milky Way, so let’s get started!
Find a good location to photograph the milky way
To begin with, you need to know that the Milky Way isn’t entirely visible all at once, and the part of it that is is not visible throughout the entire year. If you live in the Northern Hemisphere, it’ll be hard to get a good view of the Milky Way, since it is positioned towards the south of the sky. Nonetheless, opt for a time between February and September, and you may be able to capture it.
In the Southern Hemisphere, it’s much easier (and possibly better) because you’re able to see the centre of the galactic core of the Milky Way overhead. In places like the Australian Outback, where I love taking astrophotographs, there is very little to no artificial light, allowing you to see the sky very clearly, even without any equipment. You can see the milky way even with your naked eye in really clear and dark locations, however, it never looks like it does in real life compared to a longer exposure on a camera.
So remember, that you’ll need to get out of the city and find yourself an ideal dark site location to photograph the Milky Way. If you’re the camping type, you can take great pictures while in the bush because these areas have lesser light pollution, just make sure you are in a clearing where there are no trees or mountains that will block your view. Urban centres and areas close to towns and cities have great amounts of light pollution from street lights, buildings, and houses, making it difficult to see the nighttime sky, and thus the Milky Way.
Pick a Good Time
Just as you’re picking a place with less light pollution, you need to select a time of the month when the moon won’t be as bright, or preferably not visible at all. If you want a picture of a clear milky way against a black sky, opt for new moon timings.
Depending on the foreground, I prefer to have some lighting at the scene because a little natural light helps enhance other details of the surrounding area. If there isn’t any light then I will sometimes use the light from my iPhone or a torch.
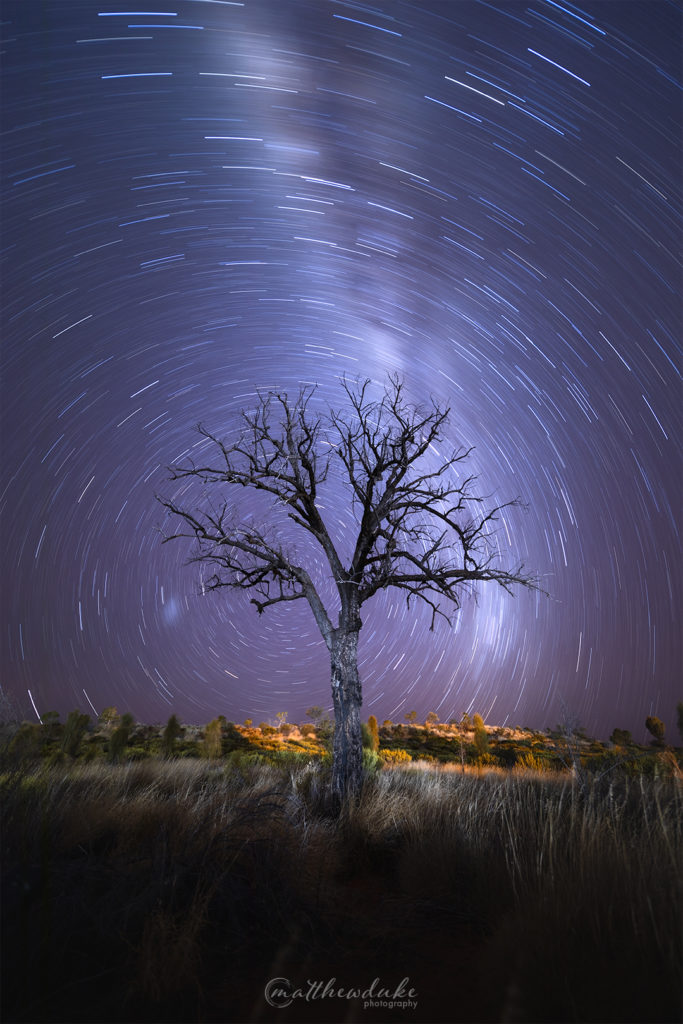
My image, Lone Tree Vortex was a 30-minute single exposure. The moon hadn’t risen yet, but if it had, it may have been way too much light for such a long exposure.
There are plenty of websites out there where you can easily look up details of the rising and setting times of the stars, moon, etc, so some planning beforehand is really important.
Map the Milky Way
If you arrive as its getting dark, you may find it a bit difficult to just wander around trying to find the best vantage point, but if you arrive earlier you can use technology to help you plan. Something like Plan It for Photographers and Photopills (my preference) will work well.
These applications for your smartphone allow you to map the Milky Way according to your location as to where you’re standing from, and simulate the sky at your chosen time of day. So you can plan with a virtual guide. This gives you a good idea of your angle and stance. If you find your preferred location earlier in the day, you can see where the milky way will be when you are there at night, mark it on the map and take the guesswork out. When you arrive you can then just focus on setting up and capturing the milky way.
Know Your Camera
It’s important that you understand your camera settings so that you don’t need to waste time scrolling through multiple options in the dark. Even though smartphone cameras are capable of capturing high-quality images, you’ll need a camera with better performance and ISO range so it can capture pictures in low-light conditions, and it will need to be mounted on a steady tripod. Make sure you have a read through your camera manual to ensure you can work out how to change its settings. To ensure your shoot runs smoothly, it is also a good idea to save some presets that may come in handy when it is dark if your camera allows this feature. It is also good to know what type of battery life you can expect from your camera and have at least one spare. If the temperature is cool and you are doing lots of long exposure images you may find that your battery life runs out faster than normal.
Personally, I use a 12mm f2.8 Laowa lens on my Canon 5DMKIV. The 12mm lens allows for a massive wide angle so you can capture the night sky but also because it has a wide aperture of f2.8 it will allow a larger amount of light in.
Normally when I am taking a landscape photograph during the day, using a tripod, I will try to have a low ISO to ensure I reduce the possibility of a noisy image from my camera. This is possible when there is plenty of light, both natural and artificial light. But when taking photographs at night time, you need to bump up the ISO to ensure you can let enough light in. Remembering that the light you are trying to photograph isn’t even on this planet but represented by the tiny stars out there in the galaxy.
When taking photographs like these, it’s usually recommended that you take pictures usually at an ISO level of over 3,200 – maybe even as high as 6,400 or even up to 10,000 depending on your lens and camera model. This allows your camera’s sensors to pick up even the faintest light that’s coming from the stars above. Since high ISO levels are proportionate to noise, you can’t afford to take the perfect shot without a tripod so don’t forget to use one. You can expect the shutter speed to be between 15-30 seconds.
Use a Tripod
For pictures in these types of conditions, you’ll need longer shutter times, which could result in blurry photos if you don’t keep the camera fairly still. This is especially true if you intend to capture the Milky Way, including the stars.
Even the most subtle of movement can lead to a distorted image, especially as you are photographing stars, and because the earth is rotating will appear to be blurry. Hence, place your camera on a tripod, and keep your tripod on an even land.
Bulb modes are frequently recommended for astrophotography so this means you’ll have higher shutter speeds of no more than 30 seconds. Even though this can result in particularly awesome photos, don’t forget to pack a shutter release cable. However, this may only be required if you intend to capture a picture of star trails.
If not, using a maximum exposure time of 30 seconds will be adequate. If you don’t have a cable release, set your shutter button to have a delay of 2 seconds, so that there is no movement after you have pushed the shutter of the camera.
Go In the Right Weather
When capturing a picture of the night sky, weather conditions become very important since even you really don’t want any cloud cover blocking your view of the stars beyond. The wind is also another important factor, because if it’s really windy and the long exposure is required, you may find it hard to keep the camera steady.
And as you will probably be standing for a long time in the open, at night, always be aware of your surroundings to stay safe, wear warm clothes and take a torch so you can see where you are walking. It is especially important to scout the area during the day so you know the safe places to walk, access and can plan your shot. I often will also go with friends so that we can shoot together and not out alone in a remote location by ourselves.
Prioritize Composition
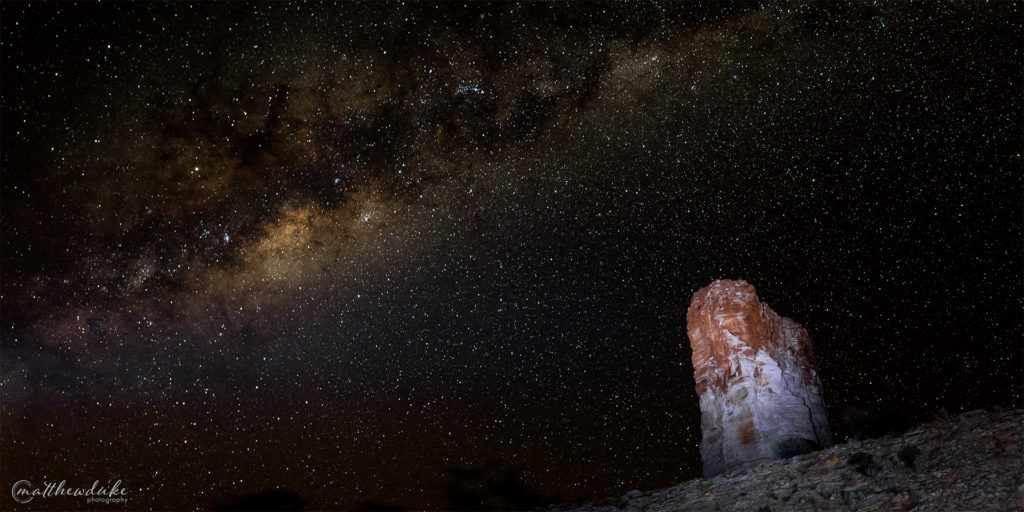
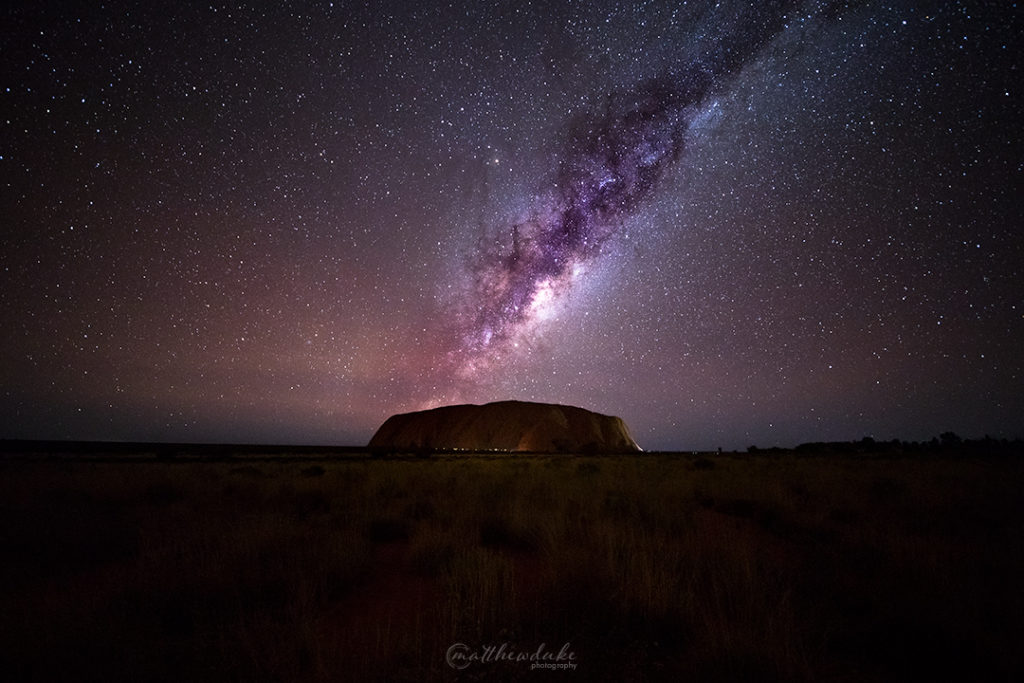
Photographs of the Milky Way are great by themselves, but to really elevate your composition it is best if you have some element of foreground interest such as a tree, rocks or some other landmark (Uluru / Ayers Rock is a great example!) It also helps to give scale to the size of the sky which is endless.
Better Focus of the Milky Way
To ensure your image of the Milky Way is in focus, make sure you set your lens to manual focus as there is no way your lens will be able to autofocus in the dark.
As you want the sky to be in focus you will be setting it at the infinity setting, however, you may need to fine-tune it based on your exact lens. When I go to photograph the milky way or any star type photo, I will select the brightest star and focus on that.
Take a few test shots and use the LCD screen to zoom in to make sure you have it pin sharp. If you have an element in the foreground it may be out of focus, so just be aware of this. It may not be critical as it will most likely be a silhouette. When using a wide-angle lens, you can move back from your foreground if you are too close. As the stars will be the main point of interest in the photograph, you do want to make sure they are in focus. It is no good photographing an amazing milky way shot that is blurry. You may also find that the infinity setting on your lens is not exactly where the manufacturer has printed the marker. On my favorite astrophotography Laowa 12mm f2.8 lens, I find that I have to bring it back a millimeter or two to get the perfect focus, this is how I photograph the milky way anyway.
Post Production
Of course, no fine art landscape photograph is complete without the right post-production. Since you heavily relied on high ISO levels, you may need to tweak some settings in your preferred photo editing software to ensure your noise is reduced, colour balances are right and other adjustments such as ensuring the sharpness levels are to taste. It is best to consider how you will edit all of the foreground and various settings when you photograph the milky way when you are taking the photo, to ensure you can do most of the work in-camera, by your selection of settings, lens, and composition.
Just be careful not to overdo it as it will quickly look terrible. Most people know what the Milky Way core looks like, however, usually, this is from seeing images of it as its not usually that clear to the naked eye, unless you are in a very dark location that doesn’t have any light pollution from street lights and buildings.
Bonus Tip
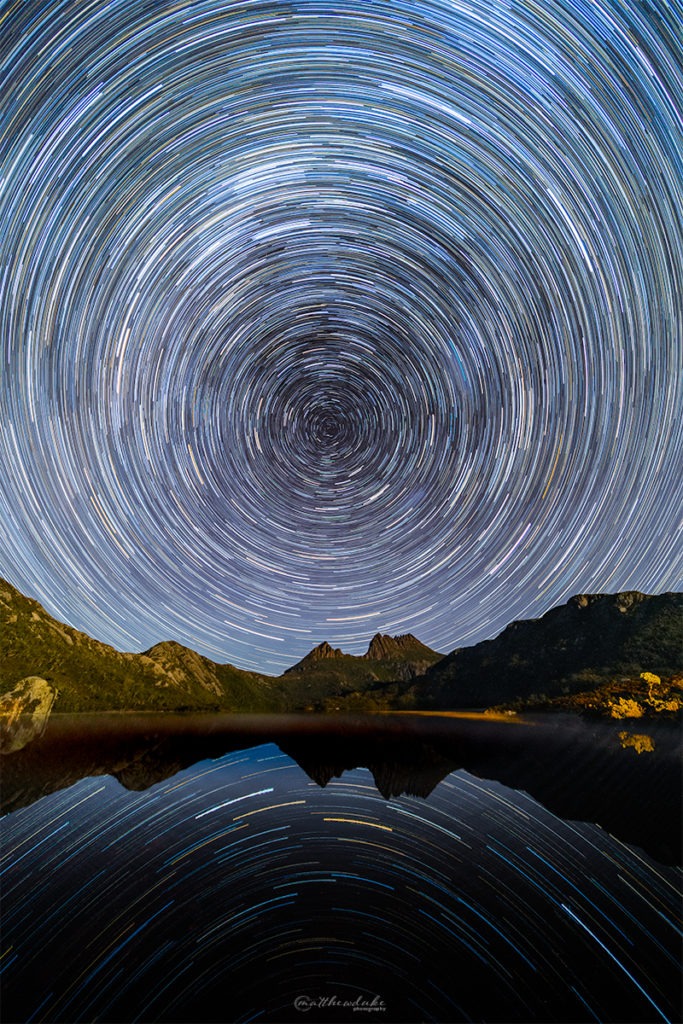
If you aren’t able to see the Milky Way from your location due to its position in the sky and the time you are there, you can always try experimenting with star trails. Here is a photo composite I took down at Cradle Mountain in Hobart. The centre of the stars is the South Celestial Pole (I used PhotoPills App to work out this location, and then I set my camera up and let it take 30-second photos for about an hour and a half non-stop. Combining all of the photos together allowed me to create these awesome star trails. Hopefully, I can write a How to take star trails article in the near future when I have some spare time!
Happy shooting!
Milky Way FAQ
What do I need for astrophotography?
You need a camera, a tripod, your fastest lens, such as f2.8 and your widest lens to fit as much of the night sky in as possible. You also need dark and clear conditions and to prepare in advance.
Which camera is best for astrophotography?
Most digital cameras these days will be suitable for some level of astrophotography. The better ones will allow you to increase the ISO and capture more details with minimal noise in the final image. Some suitable cameras include the Canon 5DMKIV orr Sony A7RIV.
What lens should I use for night sky photography?
I use a 12mm f2.8 Laowa lens on my Canon 5DMKIV. The 12mm lens allows for a massive wide angle so you can capture the night sky but also because it has a wide aperture of f2.8 it will allow a larger amount of light in.
What is the best time to photograph the Milky Way?
Just as you’re picking a place with less light pollution, you need to select a time of the month when the moon won’t be as bright, or preferably not visible at all. If you want a picture of a clear milky way against a black sky, opt for new moon timings. Depending on the foreground, I prefer to have some lighting at the scene because a little natural light helps enhance other details of the surrounding area. If there isn’t any light then I will sometimes use the light from my iPhone or a torch.